Showing posts with label bow. Show all posts

December 1, 2011

November Wrap Up!

I'm starting to decorate, shop, wrap, cook, and prepare for the holidays! Make sure you sign up to follow LibbyRibbons so you can keep up with all the creative happenings of the season! In the meantime, here's what I wrapped up in November..


My sister Courtney turned 26 this month, so I sent this to Virginia for her.
She asked for Twilight Woods lotion from Bath & Body Works, so I based the gift basket off the colors of the bottle, and added a BIG PURPLE BOW-- of course! 
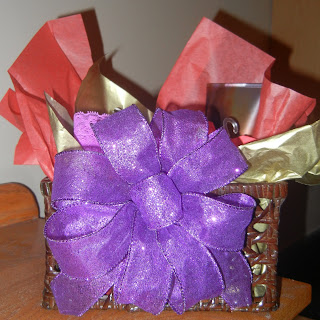

 A peak inside: Twilight Woods body wash & lotion, shower puff, aloe filled socks, travel hand sanitizers in yummy scents, some purple undies, and a $10 gift card to Victoria's Secret


 I bought this ribbon months ago in anticipation for my good friend Angie's birthday. This girl can't get enough animal print So.. when her birthday finally got here, I was so thrilled to top her champagne bottle with a massively obnoxious leopard print bow!


LOVE THIS RIBBON! 
 (added gold curly pieces for a little texture)


Happy Birthday Court & Angie! Love, love, love you!

Ps. If you'd like to learn to make a bow, stay tuned, I'll post a How-To soon!

November 13, 2011

Paper Bow Wine Topper

Perfect for either a casual occasion or for a more festive event, paper bows are easy to make and look pretty awesome!
 (if I do say so myself!)

A total coincidence that the colors of the label matched the autumn paper I'd previously picked out, but it's not a bad idea, if you're flexible about paper..or wine.


Here's what you'll need:
2 colors/patterns 12x12'' scrapbook paper - scissors- glue - 1 pipe cleaner - ribbon (with wire)


Here's How..


1. Cut each piece of scrap booking paper into strips.(about 7).
2. Roll the paper, one at a time, around your finger to create a slight curl. Tuck end and glue.
3. Continue paper around and glue again, and again until you glue the end down.
4. Once dry, pinch the end of each paper circle to create a pedal shape.
5. Complete rolling, gluing, and pinching several paper circles.
6 &7. String them each onto a pipe cleaner, alternating colors/patterns.
8. Push them close together and twist the pipe cleaner closed. Some overlapping of the paper is good.
9. Cut a piece of ribbon and tie it around the bottle's neck. Lace one side of the ribbon end through the pipe cleaner keyhole and tie the ribbon ends together again to secure. Pull ribbon end through the center, only part way and shape as center of "flower". Twist and turn the pipe cleaner and shape it as you like it. Add extra strands of ribbon and curl them using a pencil, etc.


  Cute, huh?


November 5, 2011

Where There's a Will, There's a Way.. and a Bow

I wanted to share a couple wrap jobs I've done lately,
maybe they'll provide you some inspiration!


A thank you gift- Lime green wrapping paper with a double ribbon- sheer navy with
 jewel tone paisley


Baby Shower Gift- bottle cleaner, bottles, pacifiers,
travel goodies, washcloths- all in a baby bin


Bridal Shower Gift- inspired by the apron I found! Cutting board, champagne and champagne glasses, kitchen towels, candles, and card all in great basket she can re-use! When putting the basket together, I didn't care for how the cutting board and box of glasses looked-- so I wrapped them in coordinating giftwrap.


My first diaper cake and since then it's my favorite baby gift to give!
 Green and Blue polka dot diapers (Target),
 2 Bottles to build the diapers around,
lots of ribbon, and pacifers, and washcloths to add little treasures.
A great resource for this:  How to Create a Diaper Cake.