February 28, 2012

Fabric Covered Bulletin Board


Alright people, I'm call this try-it Tuesday.. not sure it will stick, but go with it. A fabric covered bulletin board, simple enough, right?

 I made mine for my kitchen, but it would be great in an office, or child's bedroom, dorm room, classroom, etc. Think about it.. it could practically work for anyone.

(Forgive my bad photography- the picture is crooked, not the board)


 It's really easy- choose some awesome fabric (one yard is all I needed), get an already existing cork/bulletin board, and use a staple gun to secure the fabric. Make sure to pull it tight! Cut any excess fabric.


So try it!  Pin it! Share it! Let me know how it goes!


February 26, 2012

Birdseed Cupcakes


It's for the birds.. literally. Super simple birdseed cupcakes, complete with ribbon hanger. (And the birds can use the ribbon for their nests--it's a fact)

*Update: once my cupcakes dried, they didn't stay together quite as well as I'd wanted (especially since my original plan was to make a birdseed wreath)..I think overall the cupcakes should be fine, but I think adding the ingredients below (bolded) will work better for the wreath at least.

Here's what you'll need:


4 cups Birdseed
1 packet Knox unflavored gelatin
3 tablespoons light corn syrup
3/4 cup all-purpose flour
warm water
cupcake tray
Cooking spray
thin ribbon
Scissors

Estimate the length of ribbon you'll need. Tie the ends in a knot. You'll need one for each cupcake. Approximately 24.
Pour packet of gelatin into a bowl. Add 1/2 cup warm water and stir until dissolved. Stir in corn syrup and flour.

Add 4 cups of birdseed and stir. Mixture will get stickier as you continue to stir.
Spoon into greased  cupcake tray. Use a knife to wedge the ribbon deep into each cupcake. Add additional seed and press firmly.


Allow to sit until dry.

When ready, they should slide out of the tray with ease.

Hang in your trees and enjoy the visitors! So cute and the birds will love them too!


*Update: wreath to come.. hopefully it will work this time. Stay tuned!


Finally-- SUCCESS! the new recipe (above) is wayyyy better than the first, it's like super glue! (I hope these aren't famous last words) When I read about doing this, it suggested using a decorative bundt cake pan and I have to say, the examples I saw were quite pretty. BUT, I don't have a bundt pan or anything decorative for that matter, so I turned to a disposable round foil pan instead.

To create the hole, I used a drinking glass turned it upside down. Be sure to grease both the pan and the edge of the glass.


Scoop your mixture in and press firmly- really give it a good smush!


Keep smushing!


Let it sit overnight. It may look a little white and it should slide right out of the pan.


Add a fancy bow! I used unwired polka dot ribbon with the wired green sheer ribbon. It really dresses it up and makes it a great gift option.


I LOVE the sunflower- it makes it so pretty and springy!


Much better than the first crumbled attempt! Hopefully it can also withstand some wind!


February 21, 2012

Spring Wreaths in February

Okay, okay, so it's possible I'm getting ahead of myself with this whole "spring is coming" thing.. but seriously, I'm tired of the cold, and we've only gotten one snow delay once this entire winter.

And in the words of Lauryn Hill, "after winter must come spring".. in my mind (my super planner, Type A mind) I'm totally justified in getting ready early.

I may also be over eager since I made something like 4 winter wreaths (Check them out here and here)..none of which for me, so my door had an autumn leaf wreath on it from October until a few weeks ago.

The two wreaths below are very similar, yet customized for exactly what you like.


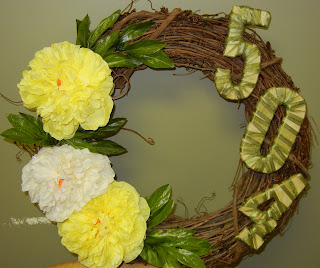
I love the idea of putting your house number on your wreath, it's so cute and practical. the flowers are both hot glued and wired in. I pulled the leaves off the flower stems and hot glued them separately.


Ribbon wrapped house numbers- as easy as it sounds. All you need are the simple wooden letters from your local craft store (I think these were $2.99 each at Hobby Lobby?) Start on one end and hot glue your ribbon to the back. wrap several times, then glue again. Keep going until you've wrapped the entire thing. Hot glue the end.


Here's a closer look:


Since I don't have a house number, only a letter, I didn't want to go that route for my own wreath. Instead I got the long vine-like stems (also from Hobby Lobby) and inserted them in to the wreath, starting each at a different point.I pulled leaves off the flower stems and added them to make it look more full.


Consider this:

Why wood wreath forms are great-
1. they're generally cheaper than Styrofoam wreath forms ($4.99 compared to $12ish)
2. It's easier to make your stems stay put!
3. It gives a more natural looking final product


February 19, 2012

Girls' Night Veggie Stir Fry

(Thanks to my best friend, Abigail for sharing her recipe!)

 Here it is- easy, healthy, and so yummy! It's virtually guilt-free so you can have that one extra glass of wine, or two. Of course fresh veggies are tastier and more nutritious but you can also make this with frozen vegetables if that's what you have on hand.

Here's what you need:

1 red bell pepper, chopped
Broccoli, chopped
1 carrot, chopped
1 bag snap peas
Mushrooms, chopped
1 small can water chestnuts (optional)
1-2 packets Simply Asian General Tso's (found on the international aisle)
Brown Rice (I used boil-in-a-bag instant)


Here's what you do:

Heat roughly a tablespoon of EVOO in your skillet over medium heat. In the meantime, cut up your veggies. Throw them in the pan, add 1/4 cup of water and saute. Add Simply Asian sauce and stir. Cook to desired veggie softness. Season with salt and pepper.

Boil water on the stove. Once boiling, add your rice and cook as box instructs.


Now plate it. And eat it, while drinking wine with your best girl friends! Yum!

(Not a great picture, but you get the idea)

February 13, 2012

Housewarming Gift Basket

Whenever anyone moves, there's always a question as to the best gift to give. Recently I made a gift basket for a good friend moving into her first apartment. It came out really cute, it's a great mix of stuff, and it's really practical too.

I wanted to incorporate both pieces she could use for entertaining and useful kitchen accessories that I've come to love, and thought she would too.


Here's what the basket contained:

Most treasures found at World Market (LOVE that place!). Also hand soap from Bath & Body Works, plastic wrap and foil from Harris Teeter. 


And bows.. duh.


Consider this..
If you want to spend less money, start with a smaller basket- then there's less space to fill. Or try replacing expensive items with less expensive items like candy, snacks, or travel size lotions and soaps, etc. After all, it's the thought that counts!

What kind of gift basket would you like to receive? Or what treasures would you want to find in a gift basket made for you?

February 12, 2012

Bedroom Carpet Replacement

I've lived in my condo for just over three years and since day one, the carpet has needed replacing. We started by removing the carpet in the living room, dining room, and hallway and replacing it with hardwood. That was in 2009. Since then, I've repainted every room, and NEARLY all the trim (still a work in progress). Now, it's finally good timing for new carpet in the bedrooms. So hereeee we go...

So we had to move three bedrooms (or actually two bedrooms and a man cave) worth of furniture out into the rest of the house. The worst part was the emptying the closets.

So it temporarily looked like a live episode of Hoarders. And if you know me, you know that made me totally crazy!

Need to pee? NOT IN HERE!


 Just a man cave couch, chillin.

And now for the mattresses.


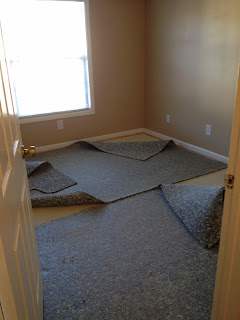
So in they came at 10:00am Saturday.. ripped up the old carpet in about 10 minutes..


Then they ripped up the padding, and put new padding down. (Stain Master)

GOODBYE SICK-O CARPET!


They were finished by 12:30! The man cave, after..

The guest room.


The paint colors from the rooms above:
Master Bedroom: Athenian Green, Behr 440F 4 & classic Taupe, Behr 290E- 3, satin/eggshell finish
Man Cave: Mesa Taupe Behr UL130- 16, satin/eggshell finish
Guest Room: ClassicTaupe, Behr 290E-3, satin/eggshell finish
White Trim in all rooms: Polar Bear, Behr W F 200, semi-gloss finish

Carpet purchased from and installed by Lowes Home Improvement.

February 7, 2012

Super Bowl Food Frenzy

As promised, I'm sharing the recipes I used for our Super Bowl party. May I recommend starting early and accepting help in the kitchen if you plan to make this entire spread for a single event. I was lucky enough to have lots of help, and still finished, literally at kick off.


Slow Cooker Shredded BBQ
Courtesy of Bryce


1 boston butt
McCormick dry rub
1 cup apple cider vinegar
1/2 cup water
1 tablespoon liquid smoke
*Note these measurements are approximate and can be adjusted for what you like!

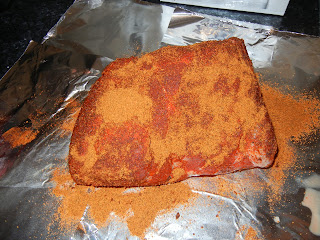
1. Cover your meat in dry rub.
2. Place it in your crock pot and add the vinegar, water, and liquid smoke.
3. Cook on low for 8 hours.
4. Remove from crock pot and allow to cool long enough you won't burn yourself then start shredding! Serve warm with the sauce you love most, or try your hand in making your own.. if I told you our sauce recipe, I'd have to kill you!


Cheesy Pigs in a Blanket


Refrigerated cans crescent rolls
Little smokies
American cheese

1. Preheat your oven to 400 degrees. Grease your cookie sheets, even when using foil.
2. Cut your crescent rolls into two pieces each, creating two smaller triangles
3. Place a piece of cheese on each newly formed triangle.
4. Roll the little smokie up into the cheese and crescent roll.
5. Tuck the end in, and lay it down on the cookie sheet, with the end on the bottom so it doesn't come unrolled.
6. Bake as instructed on the crescent roll can, roughly 11-12 minutes.

You can see when I got busy and accidentally left a cookie sheet of pigs in the oven too long. Oops! Good news is, they don't burn easily so they were still really yummy! Mustard is a favorite for dipping!


Chocolate Heath Bar Trifle
(This is a GREAT dessert to make ahead!)


1 box chocolate fudge cake mix
(oil and eggs as needed in most cake mixes)
2 boxes instant chocolate pudding
milk
1 cup strong brewed coffee
cool whip
heath candy bar, crushed

1. Bake the cake as box indicates. Allow to cool fully. Crumble.
2. Mix chocolate pudding as package indicates. Set aside.
3. Reserve about a cup of crumbled cake for the very top. Divide in half the remaining crumbles. Put one half in the bottom of your trifle or bowl. Pour half your brewed coffee into the cake.
4. Add half the chocolate pudding, layering it over the cake crumbles.
5. Add half the cool whip.
6. Sprinkle crushed candy bars over the cool whip.
7. Repeat with all layers, ending with heath bar on the very top.
8. Refrigerate for at least two hours to chill.


Fruit Salad with Cinnamon Sugar Chips


1 pack tortillas
butter cooking spray
 1 tsp cinnamon
 1 cup sugar
1 lb strawberries
blueberries
2 golden delicious apples
2 kiwis
1 tablespoon brown sugar
2 tablespoons fruit preserves (I used Strawberry Jelly)

1. Peel and cut up all your fruit.
2. Add fruit preserves and brown sugar and and mix up. Refrigerate for 2 hours to chill.
3. In the meantime, cut your tortillas into slices.
4. Mix your cinnamon and sugar in a bowl. Add as much cinnamon as you like.
5. Lay on cooking sheet and spray with butter cooking spray. Flip over and spray other side as well. Dip your buttered slices into the cinnamon- sugar mixture.
6. Return each to the cookie sheet and bake/toast in your oven until lightly browned. (350 degrees, 10ish minutes)
Serve! Delish!


Here are two additional recipes I used, which were wonderful:

(Note: By experience I learned not to hit a button on the blender and walk away. Use the "pulse" button to avoid a completely liquid salsa ;) )

So so good! Now my favorite Guac recipe! It's a must- try!


February 6, 2012

Super Bowl Party 2012

The Super Bowl, bringing people together for over 40 years. I'll be honest, I come for the food- because unless the Redskins are going to get it together and have a 1992 season, I'll never really care about who's playing. I was 5 years old in 1992, so really, they haven't been good since I've been alive.

As I was saying,  I'm all about the food, this year included. We hosted a 15ish people party and made as many football favorites as we could- everything from pigs in a blanket to slow cooker BBQ to homemade salsa and guacamole to jello shots, on and on-- literally, two tables worth of food. Totally worth spending 90% of my day in the kitchen, totally delicious!

For tonight, here's a sneak peak into party. Stay tuned this week for all the recipes I tried.
You'll be happy you did!


Thanks to everyone who came over, we had such a great time and were so glad you could make it!
Special thanks to Weslie, Abigail, and Amanda for their much needed help in the kitchen.

February 3, 2012

Peacock Lamp & Pecan Crusted Mozzarella Salad

Hellooo and Happy Friday!! Spending today finishing up the trim work in the house, cleaning like a crazy person, baking, and maybe there will be time for a little shopping? In the meantime, I hope you enjoy this Goodwill find turned trendy peacock lamp, transformed with love, fabric, and hot glue.

Before...$8 at Goodwill


 The awesome fabric I found at JoAnn's..$6.99 per yard (only takes about 1/2 a yd though)


Use the method shown here..

..and it's as cute as a button!


All for about $11.50! Works like a charm and no one will have the same lamp you have!


While you're admiring your new lamp, whip up this salad and enjoy- it's amazing!

This recipe comes from the Pampered Chef and is absolutely yummy!


Pecan-Crusted Mozzarella Salad
(SO good with balsamic dressing)


Ingredients:
1/2 cup finely chopped pecans
2 tbsp shredded Parmesan cheese
8oz log of mozzarella cheese
1 tbsp all-purpose flour
1 egg, beaten
1/3 cup bread crumbs
Extra virgin olive oil
Everything you love in a salad

Here's what you do:

1. Slice mozzarella into 8 rounds, about 1/2 inch thick each.
2. Put the flour in one bowl and the beaten egg in another bowl.
3. Combine pecans, Parmesan cheese, and bread crumbs in a third bowl.
4. Lightly coat each slice of mozzarella in flour. Then shake off the extra. Dip it into the egg and then into the pecan mixture. Make sure it's all covered.
5. Heat your skillet to medium heat and add oil.
6. Add mozzarella and cook over medium heat 1-3 minutes, or until simmering. Flip and cook the other side, making sure both sides are brown.
6. Remove from heat and add to the top of your salad.